Input System
TButt’s input system wraps the input calls for each platform’s SDK with a static interface (TBInput).
Using the Input System
TButt uses virtual buttons (TBInput.Button) that get assigned to the physical buttons of each controller using the Input Settings tool. The button maps are serialized to JSON and loaded at runtime when TBCore is initialized.
How It Works
TButt’s virtual buttons get translated into hardware buttons based on the active platform and controller.
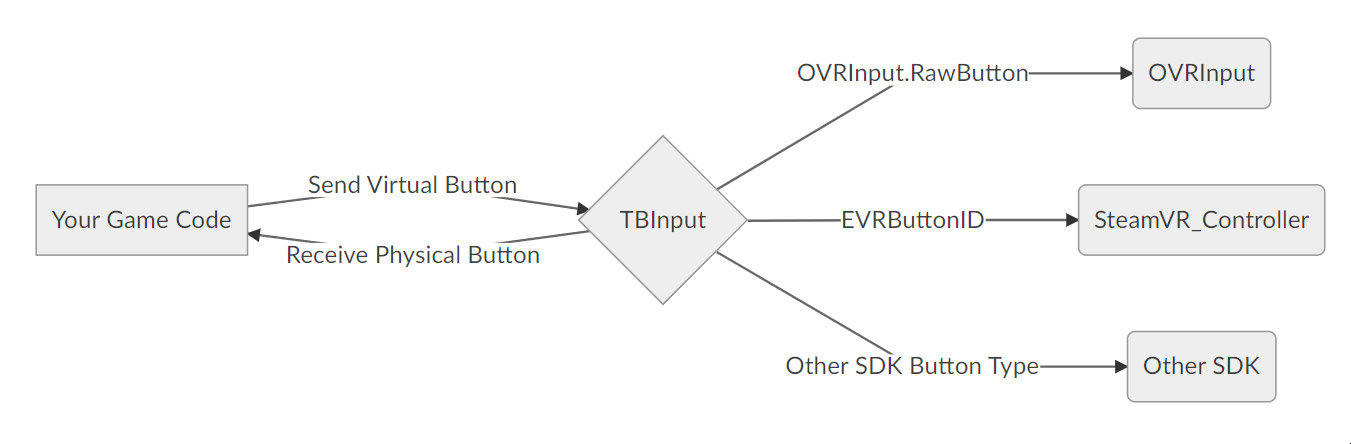
Referencing virtual buttons instead of hardware buttons in your game code lets your code scale across multiple platforms, since you aren’t relying on hardware that is specific to a single SDK.
Calls to SDK functions in your code should be replaced with calls to TBInput. Most of TBInput’s functions are fairly straightforward (things like GetButton, GetButtonDown, GetButtonUp). You can see a full list of functions in the scripting reference.
Using Button References
Buttons, touchpads, joysticks, and triggers are all just called “buttons” and get referenced by TBInput.Button. For example, if you wanted to know if the joystick on the left Oculus Touch controller was clicked, you could query it with:
TBInput.GetButtonDown(TBInput.Button.Joystick, TBInput.Controller.LHandController);
// Assumes Button.Joystick is mapped to the Oculus Touch joystick
You could query the direction of that same joystick using GetAxis2D. The Oculus Touch controller’s joystick is touch-enabled, so you can also detect if it was touched using GetTouchDown. You use the same button enum to reference the joystick in all three functions - the function determines the type of data you get back.
Using Controller References
Most TBInput functions ask you to specify a button and a controller. If you don’t specify a controller, it falls back to Controller.Active. The active controller is based on your active ControlType (which must be explicitly set through TBInput at runtime).
Heads-up: For 6DOF hand controllers, you should always specify a controller (left or right) in your input call.
Input Settings Tool
Use the TButt -> Input Settings menu to set active input types and assign button maps for each controller on your supported platforms.
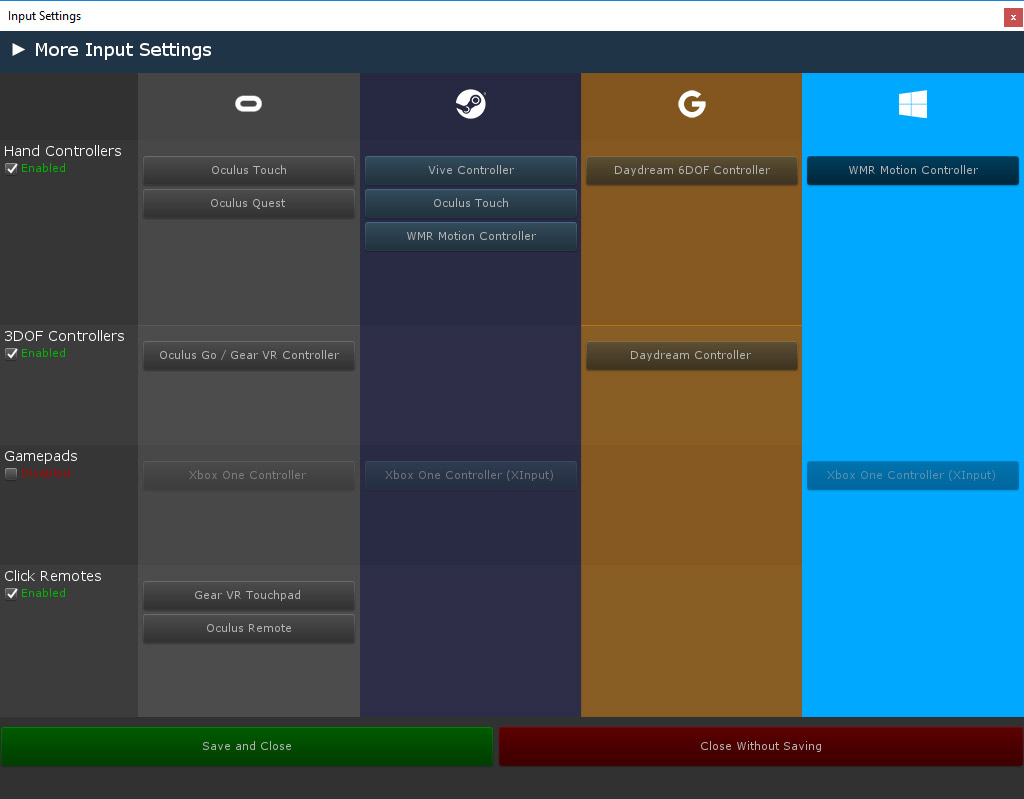
Enabling Control Types
The toggles on the left side of this menu will enable or disable ControlTypes for your game. After enabling a ControlType, you’ll have access to the controllers of that type supported by your platforms.

Assigning Button Maps
Click on a controller from the Input Settings menu to access its button maps. You can pair as many virtual buttons to each physical button as you’d like. The features supported by each physical button are also shown on this menu (touch sensitivity and analog / axis type). Button maps are saved by closing this window and choosing “Save and Close” on the main Input Settings window.
Protip: You probably don’t want to use maps like Button.LeftJoystick and Button.RightJoystick on hand controllers - it might make more sense to just use Button.Joystick and leave the separate left/right versions for gamepads since you’ll be sending the button to each controller separately anyways.
Overloading Button Maps
Overloading button maps with multiple virtual buttons is the secret sauce for TButt’s multiplatform input functionality.
Each physical button can have one, many, or no virtual buttons assigned to them. For example, the Vive touchpad might be assigned as both Touchpad and Action1, and querying either virtual button in code would reference the touchpad.
You can also have virtual buttons assigned to multiple physical buttons. For example, if you associate Action1 with 3 different physical buttons on a controller and call GetButtonDown(TBInput.Button.Action1) on that controller, it will return true if any of those 3 buttons were pressed.
Some cases where this is useful:
- Making the Vive touchpad click perform the same action as an Oculus Touch face button.
- Getting analog data out of controllers regardless of whether they use touchpads or joysticks.
- Making the Gear VR Controller trigger perform the same action as its touchpad button when porting from Daydream (where the trigger doesn’t exist)
- Tuning and changing button maps without changing your game code.
Note: TBInput provides a ton of virtual button options so your game code’s nomenclature can make sense for each control type, but it’s very unlikely that you’ll use them all. Although the buttons are called things that might sound familiar for ease of use, those names don’t mean anything on their own: Button.PrimaryTrigger could have been called Button.Potato because its functionality is driven entirely by your assignments. Pick nomenclature that fits your game and stick with it.
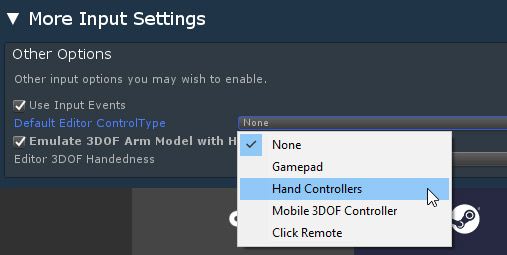
More Input Settings
Click the arrow at the top of the Input Settings menu to expand a section with additional input options. Here, you can turn on Input Events, set a default ControlType for playing in the editor, or turn on 3DOF arm model emulation with 6DOF controllers in the editor. Forcing different control types with this menu can be useful for testing a variety of platforms through the Unity editor (for example, if you are making a Daydream or Go game, testing with 3DOF arm model emulation using a Vive or Rift controller in the editor will behave functionally identical to the arm model on device).
Gamepads
Gamepads on Oculus are supported through Oculus Utilities. Gamepads on Steam and Windows 10 requires adding XInput.Netto your project and adding TB_XINPUT to your scripting define symbols. Note that XInput.Net won’t be included in Windows 10 builds, but is required for testing in the editor.
Hand Presence / Finger Tracking
TButt’s finger system uses raw input readings to help you animate the player’s hands in-game, regardless of what controller they’re using. You can query the state of a finger with TBInput.GetFinger() and it will return a float from 0 to 1, where 0 means the finger is in the “up” position and 1 means the finger is in the “down” position.
Finger data is not affected by custom button maps, which makes it more reliable for hand presence than other input checks. See GetFinger and SupportsFinger in the scripting reference for more information.
Example
You could do something like the following to set floats on a Unity Animator component and drive a rigged hand model’s animation:
float triggerVal = TBInput.GetFinger(TBInput.Finger.Index, TBInput.Controller.LHandController);

myAnimatorComponent.SetFloat(myHandFloat, triggerVal);
If you wanted to take advantage of each controller’s capabilities, you could animate the hand’s “grip” motion separate from its index finger while safely falling back on platforms without grip data.
float triggerVal = TBInput.GetFinger(TBInput.Finger.Index, TBInput.Controller.LHandController);
float gripVal;

if (TBInput.SupportsFinger(TBInput.Finger.Grip, TBInput.Controller.LHandController))
     gripVal = TBInput.GetFinger(TBInput.Finger.Grip, TBInput.Controller.LHandController);
else
     gripVal = triggerVal;

myAnimatorComponent.SetFloat(myIndexFingerFloat, triggerVal);
myAnimatorComponent.SetFloat(myGripFloat, gripVal);