Camera System
TBCameraRig replaces the camera prefab you’d normally use from each platform’s SDK (such as OVRCameraRig from Oculus or [Camera Rig] from Steam VR).
Using the Camera
Adding the Script
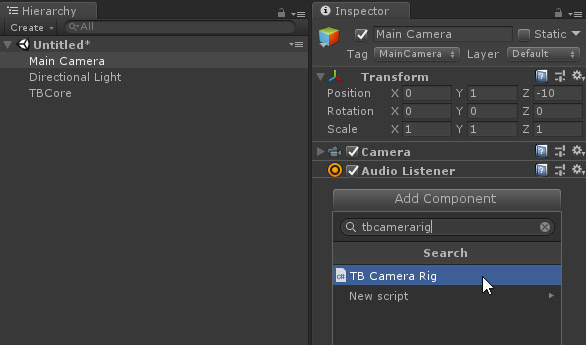
Start by adding a TBCameraRig script to Unity’s standard camera in your scene. You can make this a prefab and use it across all your scenes if you want. You’ll want to read the rest of this page before setting up a prefab, though!
Nested Objects
If you keep any GameObjects set as children on your camera, you will need to unparent them make them become children at runtime instead. If you have spacing offsets or other elements you need to preserve, you can make a new container GameObject to represent your old camera and parent that object to TBCameraRig.instance.GetCenter() instead:
void Start()
{
     transform.SetParent(TBCameraRig.instance.GetCenter());
     transform.localPosition = Vector3.zero;
     transform.localRotation = Quaternion.identity;
}
You can alternatively attach the TBTrackedNodeHelper script to a GameObject and set its node to “Head” or “Center Eye” to parent it to the camera at runtime.
References to the Camera
The Unity Camera component on the GameObject with your TBCameraRig script only exists for previewing your game and setting up normal camera settings (like clear flags and clipping planes). That component gets destroyed and replaced with a new camera based on your active platform at runtime. You can use TBCameraRig.instance.GetCenterEyeCamera() to get a reference to the active camera from other scripts.
Careful: If you had dragged a reference to the camera into an inspector window somewhere, that will need to be updated to assign at runtime as well.
Billboarding, tracking space positions, and more
When referencing TBCameraRig, make sure you’re referencing the right part of it for what you need. For example, TBCameraRig.instance.GetCenter() should be used for billboards because it represents the transform that the camera is attached to, but TBCameraRig.instance.GetTrackingVolume() will return the center of the play space. See the full TBCameraRig reference for more details.
When using artifical locomotion, we recommend moving TBCameraRig.instance.transform rather than moving the tracking volume.
Camera Settings
Tracking Origin
Tracking origin settings are assigned through the Core Settings menu.
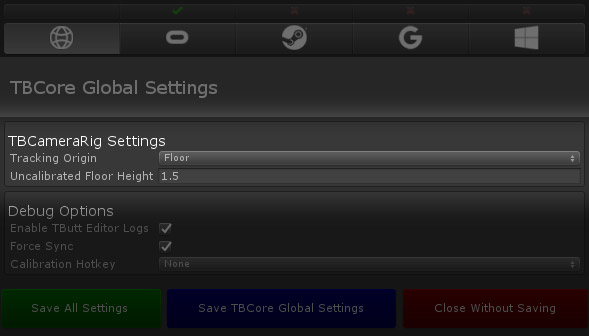
Floor. If you are making a room scale or standing experience, move the camera in your scene down to the floor and select Floor from this dropdown. The camera will read the player’s height and track appropriately at runtime.
Eye. If you are making a seated or third person experience, move the camera in your scene to where you want the player’s eyes to be and choose Eye from this dropdown. The camera will ignore the player’s height and stay where you put it at runtime.
Uncalibrated Floor Height. If the platforms/headset does not provide the player’s height, the Uncalibrated Floor Height value will be used as a fallback. This value is in meters, so for example, if you set it to 1.5, the camera will make the player 1.5m tall. This value is ignored when the tracking origin is set to Eye. See the table below for the state of each platform’s height support:
| Platform | Floor Height Type |
|---|---|
| Oculus (Rift / Quest) | Calibrated |
| Steam VR | Calibrated |
| Windows Mixed Reality | Calibrated |
| Oculus (Go /Gear VR) | Uncalibrated |
| Daydream | Uncalibrated |